How to switch to btrfs
Partition layout
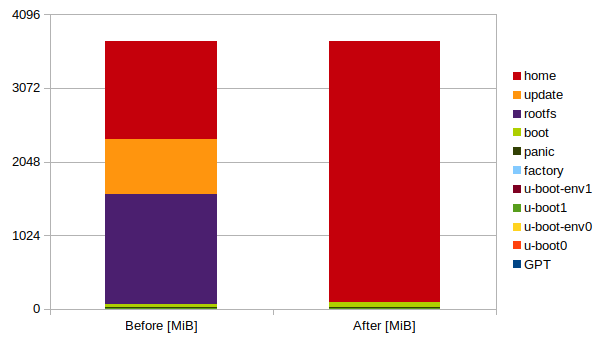
The following table shows the partition layout before and after the switch.
| Partition | Name Before | Before [MiB] | Name After | After [MiB] |
|---|---|---|---|---|
| GPT | 1 | 1 | ||
| mmcblk0p1 | u-boot0 | 2 | u-boot0 | 2 |
| mmcblk0p2 | u-boot-env0 | 1 | u-boot-env0 | 1 |
| mmcblk0p3 | u-boot1 | 2 | u-boot1 | 2 |
| mmcblk0p4 | u-boot-env1 | 1 | u-boot-env1 | 1 |
| mmcblk0p5 | factory | 1 | factory | 1 |
| mmcblk0p6 | panic | 24 | panic | 24 |
| mmcblk0p7 | boot | 32 | boot | 64 |
| mmcblk0p8 | rootfs | 1536 | home | 3632 |
| mmcblk0p9 | update | 768 | ||
| mmcblk0p10 | home | 1360 |
Automatic conversion
If you don’t mind loosing the contents of the update and home partition you can do this right now. Otherwise backup whatever is there you want to keep, or proceed to Manual conversion and make sure you understand the process.
Otherwise, building as always with make image or bitbake -k edison-image will now produce edison-image-edison.btrfs as well.
This needs some pre-processing before it can be used. If you use make image that will be done automatically.
If you build your image using bitbake -k edison-image, you can use make postbuild or alternatively:
meta-intel-edison/utils/flash/btrfsSnapshot.py
will rearrange so that the image contains @, @modules and @home subvolumes.
It can then be flashed using:
./flashall --btrfs
@home which will be lost. If you want to save your home directory, now would be a good time.This will resize the boot partition and discard the update and home partition. /home will be mounted with a subvolume called @home. The root’s home directory will be on /root to prevent boot problems when there is a problem mounting @home.
Flashing will take quite a bit longer than you are used to, due to the (Yocto’s default) size of the image. Even though all that space is not used.
The good news is, this is probably the last time you will be using flashall.sh (unless you horribly break something and want to start over).
After you have the btrfs based image running you can use btrfsFlashOta.sh. This sends a btrfs snapshot (subvolume) to Edison that you can boot separately.
Further btrfsFlashOta can send/update/delete a kernel, update U-Boot and U-Boot Env. Basically this implements the functionality of flashall.sh without relying on a USB connection.
Manual conversion
This is what we want to accomplish:
- Increase the size of
boot - Install rescue image into
boot - Add the rescue image to U-Boot boot variables
- Boot into rescue image
- Delete the
updatepartition - Resize
rootfsto use available space - Install
btrfsimage intorootfs - Convert
homeext4partition tobtrfsand take snapshot@home - Btrfs send
@homesnapshot torootfspool - Delete the
homepartition - Resize
rootfsto use all available space - Rename
rootfstohome - Boot into
home
The following is intended more to document what’s going on in the process then to really do the conversion this way. But if you really want to, you can.
1 - 3. Starting point: ext4 Kirkstone image with btrfs patches
If you already had this flashed you can skip directory to step 4.
Build and flashall (but see Warning below) as you would normally a version with the btrfs patches. This will:
- Update U-Boot to a
btrfsenabled version - Install in the boot partition:
bzImageandinitrd. The kernel hasbtrfsenabled and theinitrdhasext4andbtrfstools for repair and maintenance. Even though the partition is calledboot(fat formatted) we will use it as a rescue image only. Currently the size does not exceed 20MiB and should easily fit, but we will take the opportunity to increase the size to 64 MiB to allow it to function as a usb disk when in gadget mode.
Expandingbootwill move the start ofupdatepartition and make it unreadable.Warning: Yes, you read that correctly. This operation will destroy yourupdatepartitionmmcblk0p9. Before runningflashallit would be a good idea to double check what is there and salvage it now you still can. - Update the U-Boot environment to enable booting the rescue image.
This is how your partitions will be redefined:partitions='uuid_disk=${uuid_disk};name=u-boot0,start=1MiB,size=2MiB,uuid=${uuid_uboot0};name=u-boot-env0,size=1MiB,uuid=${uuid_uboot_env0};name=u-boot1,size=2MiB,uuid=${uuid_uboot1};name=u-boot-env1,size=1MiB,uuid=${uuid_uboot_env1};name=factory,size=1MiB,uuid=${uuid_factory};name=panic,size=24MiB,uuid=${uuid_panic};name=boot,size=64MiB,uuid=${uuid_boot};name=rootfs,size=1536MiB,uuid=${uuid_rootfs};name=update,size=704MiB,uuid=${uuid_update};name=home,size=-,uuid=${uuid_home};'Also there will be some new variables in U-Boot:
boot_rescue=zboot ${loadaddr} 0x1800000 0x6000000 0x1800000
bootargs_rescue=debugshell=0 tty1 console=ttyS2,115200n8 root=/dev/mmcblk0p7 rootfstype=vfat systemd.unit=multi-user.target hardware_id=00
do_rescue=setenv bootargs ${bootargs_common} ${bootargs_rescue}; run load_rescue; run boot_rescue
load_rescue=load mmc 0:7 ${loadaddr} bzImage;load mmc 0:7 0x6000000 initrd
If anything goes wrong the Rescue image will have the tools to fix it (in the worst case you can of course always do flashall --recovery and start over, but that is a bit tedious isn’t it).
To get to Rescue:
press <ESC> during boot to enter U-Boot

run do_rescue
4. Boot into ext4 Kirkstone image
Rebooting Edison should take you into Kirkstone on mmcblk0p8 (rootfs).
The first time it will run the /sbin/post-install.sh script, let it complete.
It may be that the update partition has been fat32 formatted earlier, or maybe it’s corrupt. If it’s fat formatted and you are connected over usb this partition maybe mounted on your host (as a gadget), you might want to unmount it now.
Anyhow we are going to delete it in the next step.
5 - 6. Rearrange partitions
parted /dev/mmcblk0

unit s # show size in sectors
print  # check if all partitions are as in table above

    Model: MMC H4G1d (sd/mmc)
    Disk /dev/mmcblk0: 7634944s
    Sector size (logical/physical): 512B/512B
    Partition Table: gpt
    Disk Flags:

    Number  Start     End       Size      File system  Name         Flags
     1      2048s     6143s     4096s                  u-boot0      msftdata
     2      6144s     8191s     2048s                  u-boot-env0  msftdata
     3      8192s     12287s    4096s                  u-boot1      msftdata
     4      12288s    14335s    2048s                  u-boot-env1  msftdata
     5      14336s    16383s    2048s     ext2         factory      msftdata
     6      16384s    65535s    49152s                 panic        msftdata
     7      65536s    196607s   131072s   fat16        boot         msftdata
     8      196608s   3342335s  3145728s  ext4         rootfs       msftdata
     9      3342336s  4849663s  1507328s  fat32        update       msftdata
    10      4849664s  7634910s  2785247s  ext4         home         msftdata

rm 9   # delete update partition !! can not be recovered

resizepart 8 # until 1 sector before start of home (partition 10)
    Warning: Partition /dev/mmcblk0p8 is being used. Are you sure you want to continue?
    Yes/No? yes
    End?  [3342335s]? 4849663s

quit
Now resize the filesystem rootfs to make use of the larger partition:
/lib/systemd/systemd-growfs /
Now you have 1 large rootfs and 1 home partition.
root@edison:~# df
Filesystem      1K-blocks   Used Available Use% Mounted on
none               465160      4    465156   1% /dev
/dev/mmcblk0p8    2146112 863324   1162868  43% /
tmpfs              479208      0    479208   0% /dev/shm
tmpfs              479208    748    478460   1% /run
tmpfs              479208      0    479208   0% /sys/fs/cgroup
tmpfs              479208      4    479204   1% /tmp
/dev/mmcblk0p5       1003     21       911   3% /factory
tmpfs               95840      0     95840   0% /run/user/0
/dev/mmcblk0p10   1337936   5048   1316504   1% /home
7. Install btrfs image
It is possible to convert the existing ext4 partition to btrfs. But it is much less work to just flash the already built btrfs image.
Building with make image or bitbake -k edison-image produced a edison-image-edison.btrfs in addition to edison-image-edison.ext4. This needs some pre-processing before it can be used:
make postbuild
will rearrange so that the image contains @, @modules and @home subvolumes.
The following steps require accessing the Edison using DFU. If you have not followed the instructions in Avoiding Permissions Issues, you will need to invoke dfu-util as root with sudo each time.
To flash the Edison Arduino board you need 2 USB connections.
-
Connect the first USB cable to the USB port marked as 3 in the photograph below.
This cable will be your serial connection to the Edison. To connect to the edison you might use a terminal emulator likegtkterm. The serial port is probably /dev/ttyUSB0 and the baud rate is 115200 with parity none. If you prefer the command line you can usescreen /dev/ttyUSB0 115200. -
The second cable to attach goes to the USB port marked as 2 in the photograph below.
This port is a special port that can act as USB host or USB slave of which only one is active at a time. As you will be connecting to a host port of your PC, it needs to be configured as slave on the Edison. Push the switch down in the direction of the micro USB ports so that the port is enabled.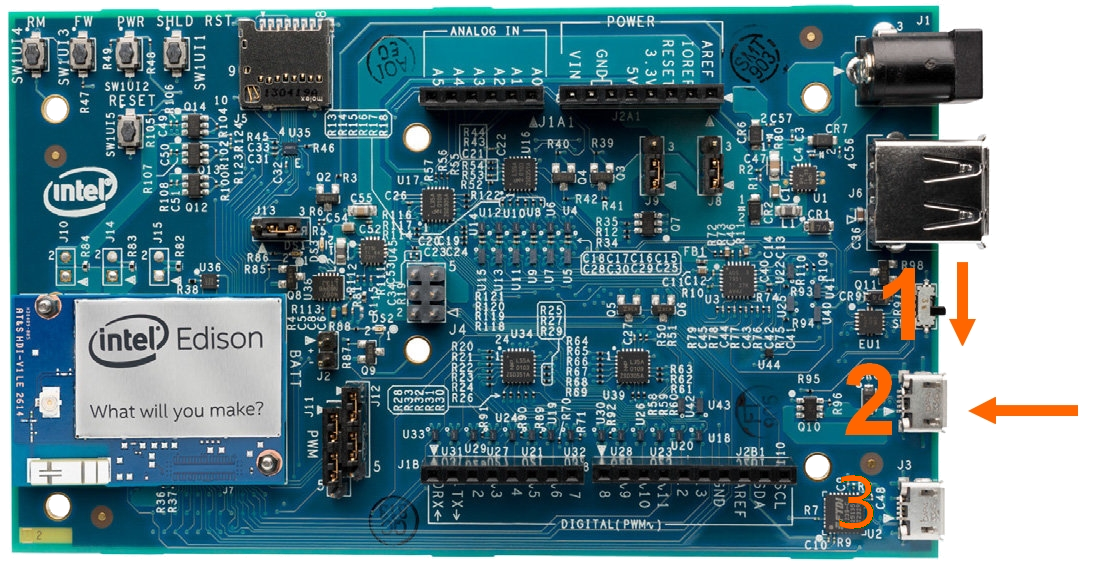
-
On Ubuntu you might need to install the package
dfu-util. -
Press the reset button (under the text RESET in the picture above).
-
In your terminal press the ESC key to interrupt the boot process.
-
You will probably see:
U-Boot 2020.04 -
In your terminal type at the
boot>prompt:run do_force_flash_os -
In a second terminal window:
dfu-util -v -d 8087:0a99 --alt rootfs -D edison-image-edison.btrfsThis will flash the image to the rootfs partition. In the first terminal window you may watch the flashing to complete.
#
DFU complete CRC32: 0xf340088e
DOWNLOAD ... OK
Now flash the btrfs enabled U-Boot environment and it’s backup and reboot
dfu-util -v -d 8087:0a99 --alt u-boot-env0 -D edison-btrfs.bin
dfu-util -v -d 8087:0a99 --alt u-boot-env1 -D edison-btrfs.bin -R
8 - 12. Move home to rootfs/@home
First we convert home to btrfs, then take a snapshot and send it to rootfs:
mkdir /media/home
btrfs-convert /dev/mmncblk0p10
btrfs scan
mount btrfs -t btrfs /dev/mmncblk0p10 /media/home
btrfs subvolume snapshot -r /media/home /media/home/@home
btrfs send /media/home/@home | btrfs receive /media/rootfs
btrfs property set -ts /media/rootfs/@home ro false
btrfs balance start /media/rootfs # you could skip this, but if you run it let it complete
umount /media/home
umount /media/rootfs
Get rid of the home partition:
parted /dev/mmcblk0

unit s # show size in sectors
print
rm 10  # delete home partition !! can not be recovered
resizepart 8 7634910
Rename the rootfs partition to home
name 8 home
quit
Mount and resize home:
mount btrfs -t btrfs /dev/mmncblk0p8 /media/rootfs
btrfs filesystem resize max /media/rootfs
13. Boot into home
umount /media/rootfs
Resetting the Edison should boot you right into the kernel and initrd located in the @boot subvolume on the home partition. The root subvolume @, will be mounted on / and @boot on /boot after the switchroot.
@modules mounted on /lib/modules. This will allow us to have a 2nd bootable image @new and at the same time multiple kernel versions installed in @boot, with their corresponding modules on @modules. Each bootable image we can then be booted with either kernel.